30 December 2012

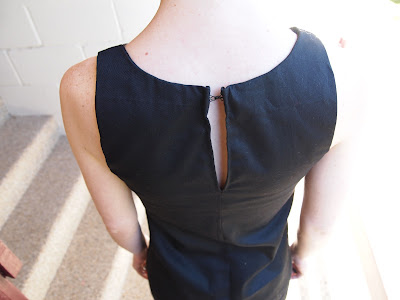
Skull dress

I bought some fabric in the Spotlight post-Christmas sales, including this skull fabric. Mr C did not quite understand my choice of 'boy' fabric, but I figured I would make it look 'girly' as a skirt or a dress.

I wanted to have a go at using bias binding for my neck and arm holes (instead of bothering with facings), so I decided to try it on the Miss Marlo dress from Pip's Sew La Tea Do book. (I've previously used the same pattern for the dress and top in this post.) Most tutorials tell you to hand sew the binding on the inside so that the stitching doesn't show on the outside, but I can't be bothered with such time-consuming methods. The black stitching is barely visible on the binding (unless you're looking very closely), so I'm happy with it.


Aside from the binding, I also took the dress in slightly and make it a bit longer than the pattern. It's certainly not something I'd wear every day (perhaps it's not work appropriate!), but I'm pretty happy with it nevertheless. Even if I do look like a teenage boy trapped in a 30-year-old woman's body...

02 December 2012

Mustard pear top with collar

Included in my fabric haul from Spotlight last week was some mustard-coloured cotton with a white pear print. I originally planned to make a skirt with it, but yesterday wondered how it would look as a top with a Peter Pan collar. I didn't have a pattern for such a thing, so I decided to adapt this top and add the collar myself. After scouring my pattern books, I found the perfect collar design in a book of 1980s kids' party dresses.

There's not much to say here, other than it turned out amazing. I'm quite comfortable boasting about this one. Everything is perfect. The zip is perfect, the fit is perfect and, of course, the collar is perfect. I sewed the collar pieces together and attached them to the shirt front right before I added the neck facing. I don't think I couldn't have planned it better.


I think after this success, I'm going to add collars to tops more often...

25 November 2012

Japanese cotton sateen skirt

I recently purchased a few cheap New Look patterns online, but didn't have any suitable fabrics for them. A visit to Spotlight and $98 later, I ended up with an assortment of designs that I could instantly picture as dresses and skirts.

I decided that the red and cream Japanese cotton sateen floral print would work perfectly as a skirt, and cut out the pieces for view D of this (minus the bows).

This is a really simple skirt to make (I even followed all of the instructions to the letter without cutting corners!). That said, I always struggle to get outside pockets looking as perfect as they should be. Even though my pocket stitching is a little wonky on the rounded corners, it's not too noticeable as the fabric is vibrant enough to detract away from it.


I made a size 8, which sits a little lower on the hips than I'd like. This is probably because I'm used to making high-waisted skirt designs, but I think next time I might make a 6. If I omitted the pockets, I could very easily sew the skirt together in under two hours.


04 November 2012

Black denim meringue skirt

I bought the Colette Sewing Handbook earlier this year, but hadn't tackled any of its projects until this weekend. I'd had my eye on the meringue skirt, so decided to try and make a black denim version.

While this is a very easy pattern to make, it's extremely fiddly in terms of hand-sewing and pressing. I decided to ignore a lot of the pattern instructions and do whatever the hell I wanted, because I consider myself some sort of sewing renegade. Or maybe I'm just impatient and like to cut corners.

Anyway, this took forever due to turning in and pressing all of the scalloped edges. I'm still not entirely happy with the curves, so I haven't fully hand-stitched the hem yet in case I want to try and round the edges some more. You see how I look cranky? That's because I am. How unusual.


I decided to use a black and white gingham for the facing. It's probably a little too light for this kind of thing, and I probably would have been better off using a heavier cotton.

I like this skirt design, but I probably wouldn't make it again. I spent at least two hours cutting the pattern and fabric, and about six hours constructing the skirt (including pressing and hand-sewing). There are plenty more skirt patterns that look just as good and require far less (or no) hand-stitching, so this won't become one of my staple designs.

14 October 2012

Candy stripe skirt

Yesterday Mr C was being crafty, so I decided to make good use of my own time and make a skirt. I'd had this fabric cut for over a year but never bothered to sew it, which meant that it only took me a couple of hours to pull the skirt together.


This is the same pattern I've used half a dozen times. It's easy to create a unique look with each one by customising it with different fabrics, buttons, zips and pockets. This candy stripe fabric was given to me by a friend (I've used it to make a summer dress previously). The buttons are from Skull Buttonry (where all of your button purchases help to feed kids at the Foundation18 orphanage in Indonesia).

19 August 2012

Project: Minnie Mouse blouse

I spent a bit of time last week trawling through the huge stash of Make It Easy sewing magazines and patterns that my Nanna gave me. Make It Easy was one of those weekly magazine series in the 1980s, and I now have the whole set. While there are some rather, ahem, scary-looking fashions (triangle-covered dungarees, anyone?), there are also some really cute ones.

I found this blouse pattern in magazine 3, which implies that it's an easy design. It's not. In fact, I wouldn't attempt this without at least a year of sewing experience. I did ignore some of the instructions and make up my own (like using an overlocker stitch to finish the neck hole and cuffs in the inside instead of hand-sewing them).


The sizing with these patterns is a bit weird. According to their measurements, I am a size 8 in the tops, and a size 10 (!) in the pants and skirts. This blouse is quite generously sized (as per the style in the 1980s), but the neck hole is weirdly small (I had to squeeze my tiny head through). Next time I'd simply cut the slit in the front of the blouse a little bit longer.


In these photos I'm wearing the blouse with a black skirt I made at the start of 2011 (also made from the Make It Easy Patterns, but before I had the instruction magazines). I think it looks best with a skirt, but could also be worn with skinny jeans (either untucked or not). I think I might redo the hem before wearing it untucked, as it looks a little wonky (the tension on my machine went a bit weird after I'd done some gathering stitches).

This was easily the most complicated thing I've made, but also probably the cutest. I mean, I look just like Minnie Mouse!

05 August 2012

Latest sewing projects

A couple of months ago I decided to tackle the Miss  Marlo dress in Pip Lincolne's Sew La Tea Do book. I'd been wanting to make it for a while, but hadn't bothered to print out the updated pattern from her website. (Note to people with the first imprint of the book: there was a printing error on the Miss Marlo pattern, so you'll need to get a new one here.) I also decided I wanted to scale the pattern down a little bit, as the smallest size was S to M.


It's a really simple dress to construct. Pip's method of doing facing is really easy, so if you've never sewn anything with facing before it's a good place to start. It also tucks in neatly with very little fuss (I can't say the same for facing on many other patterns). In scaling down the pattern I must have done something weird, because the front ended up 6 centimetres longer than the back. I was able to easily fix the problem by adding a feature strip of red fabric to the bottom. The pocket is made from some Robert Kaufmann fabric I had in my stash.


I later decided to try my hand at turning the dress into a top. I scaled the pattern down further, and used a larger seam allowance for the facings to get a more fitted look (using a black fabric that has a little stretch).


The buttons are just some of the many I bought from Skull Buttonry. The Skull Buttonry Etsy store is run by Cate, who many of you many know as the brilliant woman behind the Foundation 18 orphanage in Indonesia. In addition to her other Etsy stores raising money for the orphanage (see Foundation 18 and The Giving Bowl), Cate now sells buttons to raise much-needed funds (with ALL of the profits going to the cause).

23 June 2012

New art in the house

This is Bingo, by Erk.


This is Sexy black hamburger, by Maya Hayuk.


And if you're wondering where the Hawaiian postcards went to, they're now in the bedroom.

21 April 2012

Finished striped tulle skirt

Remember my planned birthday skirt? After consulting with a few people about how to tackle it, I made a start a few weeks ago. I've been chipping away at it a little bit at a time since then, and finally finished it today.


In the end, I decided to use a cotton voile for the lining, and attached the gathered tulle about a quarter of the way up from the bottom of the lining (so that there would be something between the tulle and my legs). The lining was then hemmed half a centimetre shorter than the outer skirt so that it wouldn't be seen under the exposed part of the tulle.

I ended up using a metal jean zipper as I realised at the last minute that it was the only one I had here that was long enough. That worked out ok, as I it exposed and didn't sew across the metal teeth like I normally do. It seems popular to sew the zipper tape for these to the outside of garments at the moment.I have no idea why, because it makes it look like someone's made a stuff-up.

I wanted to sew a feature bow as well, but for the time-being I'm just using this ribbon I had lying around. I think it works well in any case.

I might make a few more tulle skirts. It takes twice as long (as you're effectively sewing two skirts together), but I think the result is worth it.